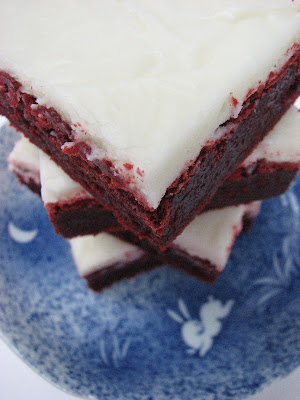
Oh my word these are yummy! I wasn't so sure when I first pulled them out of the oven. I thought they were overbaked because the top had kind of a crust over it. I figured the whole pan would be dry. However, underneath that crust was a very moist and fudgy crimson brownie. Really really tasty. I found this recipe on
This recipe was sure easy to throw together but it takes a long time for them to cool before they slice nice & neat. Some of my family would have preferred them un-iced but I can't imagine red velvet cake without icing so I had to add it. I spread the cream cheese icing on while they were still warm. I like it when the icing gets really thin and warm and then settles into a nice smooth flat top when cooled. The original recipe had mentioned garnishing the top with white chocolate curls which would have been delightful but I didn't have any white chocolate. When I first pulled these out of the oven, I figured these would be just like a red velvet cake but simply spread into a flat pan and served horizontal. I was wrong. These definitely do not have the nice soft texture of a good red velvet cake. They are dense and fudgy and have slightly more chocolate flavor than your average red velvet cake. I didn't measure my chocolate very accurately before melting it so I could have been a little heavy handed with the amount. But whatever....they still turned out heavenly and I will definitely be making these again. These brownies would be wonderful to give as a gift or bring as a casual dessert for a party. They are so pretty to look at with their deep beautiful red color. I bet they'd be even more stunning with some sort of garnish or decoration on top.
Enjoy!
I didn't use a specific cream cheese icing recipe. I literally just threw a chunk of cream cheese into a bowl, added some softened butter, clear vanilla, cream & powdered sugar. I added powdered sugar & cream until I reached desired consistency. I always make brownie icing a fair amount thinner than I would cake icing. I like it to be nice and smooth on top.
Red Velvet Brownies
My Recipes
1 (4-oz.) bittersweet chocolate baking bar, chopped
3/4 cup butter
2 cups sugar
4 large eggs
1 1/2 cups all-purpose flour
1 (1-oz.) bottle red liquid food coloring
1 1/2 teaspoons baking powder
1 teaspoon vanilla extract
1/8 teaspoon salt
Preparation
1. Preheat oven to 350°. Line bottom and sides of a 9-inch square pan with aluminum foil, allowing 2 to 3 inches to extend over sides; lightly grease foil.
2. Microwave chocolate and butter in a large microwave-safe bowl at HIGH 1 1/2 to 2 minutes or until melted and smooth, stirring at 30-second intervals. Whisk in sugar. Add eggs, 1 at a time, whisking just until blended after each addition. Gently stir in flour and next 4 ingredients. Pour mixture into prepared pan.
3. Bake at 350° for 44 to 48 minutes or until a wooden pick inserted in center comes out with a few moist crumbs. Cool completely on a wire rack (about 2 hours).
4. Lift brownies from pan, using foil sides as handles; gently remove foil. Spread cream cheese frosting on top of brownies, and cut into squares.


12 comments:
I've made these brownies before too and absolutely loved them.
mmm. This brownies look soo good. My kind of recipe!
Is the cream cheese frosting bought in tub or made?
I made the cream cheese icing. I mention the ingredients under the 4th photo. Most of the time I use milk instead of cream. I try to always use clear vanilla extract so I can keep my icing white.
I made the cream cheese icing. I mention the ingredients under the 4th photo. Most of the time I use milk instead of cream. I try to always use clear vanilla extract so I can keep my icing white.
I absolutely love your blog!!! DO you have a facebook page?
I did not have very good luck with these. They baked super funky. I think it's because I live in Colorado, so most baking recipes need to be altered for high altitude, which I didn't do because I wasn't sure what alterations to make... Even though they fell apart and I ended up throwing them out, my son and I enjoyed a few bites beforehand and they were pretty good! Wish I knew what to change for next time because I'd like to try them again.
Mine ended up looking like cake and tasting the same way.
Thanks for shareing this comment
thanks
Amazing post
Find best Delhi / Noida Girls we have top rated female girls in Delhi are beautiful, charming, sexy who can fulfill all your desires.
Thankx For Sharing.
Vip Girls Service Delhi
Vip Girls Service
Model Girls
Celebrity Girls
Hotel Girls
Girls In Aerocity
High Class Connaught Place Girls
Independent Gurgaon Girls
Independent Noida Girls
Independent Dwarka Girls
Post a Comment