Showing posts with label Pie. Show all posts

Sunday, November 13, 2011

Breville Pie Maker from Williams Sonoma

My birthday was on Friday - 11/11/11.  I received this much wanted Breville Pie Maker.  I've had my eye on this for quite some time and have read all the reviews on it and was anxious to try it myself.  Today was the day! This pie maker is only sold at Williams Sonoma and it's now on sale for $99.  I wanted my first pie making experience with my new machine to be really easy, so I purchased the refrigerated Pillsbury pie crust.  I also purchased 2 cans of Wilderness pie filling - raspberry & cherry.  I started out by very lightly seasoning the non stick surface with vegetable oil.  Then I plugged it in to preheat.

 I know these photos are dark and not so good but I was so excited to post my experience that I had very poor light and just went with it.  Anyway......I simply unrolled the crust, used the cutter that's inluded in the box (1 size for the bottom crust & another for the top crust).  It was so easy to cut the bottom crust, place it on the non stick surface and then softly push it into the mold with another plastic gadget that they include for just that purpose.

Once all 4 of the bottom crusts were in the wells, I placed 1/3 cup of filling into each well.  That's how much the instruction book says to use.  They warn against too much filling because of overflowing. 
Afterward I felt like I could have added a bit more.


I missed photos of some steps, but after you fill each bottom pie crust with filling, you place another circle of pie crust on top of that. You do not have to press or crimp the edges because the machine does that as you close it while baking.  The machine fully closes and locks while baking.  I baked mine for about 15 minutes. 
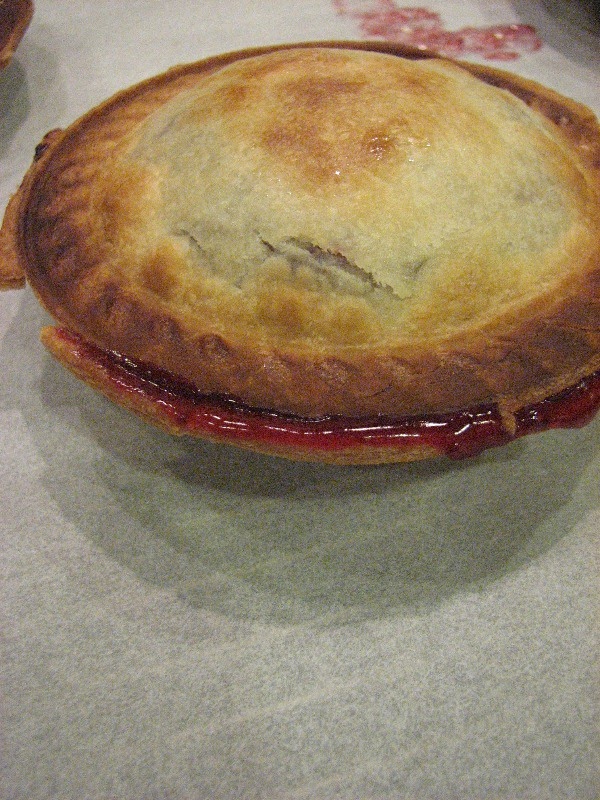

 I should have taken my pies out sooner but the top of my pies still had a soggy patch of crust so I had to keep them in and now the edges are too dark.  Not sure how to remedy that but I just need to play around with it more.  I tell you one thing, I really did NOT like that Pillsbury crust.  I will not purchase that again!  I will try another brand or try making my own.

 This is the only pie that had a bit of seepage.  I don't think it was overfilled. I think the edges didn't crimp tightly on this one.


The bottom crust was perfectly done and the top of the crust was fine. It was only the edges that were too done.

Overall, I'm really pleased with my new pie maker so far.  I just need to figure out how to prevent the edges from getting so brown.  I received a book with it that was written especially for this machine.  It has everything from fruit pies, to savory chicken pot pies to quiches and mini pizza pies.  I can't wait to try them all.  I will be sure to post again when I make something else.  Here is the link below to Williams Sonoma.

Tuesday, June 21, 2011

Cherry Berry Pie

I've said it before.  Pies are not my thing.  I DO love eating them, I'm just not good at making them.  Every once in awhile I think "I'm going to try again!".  I see some good looking recipe and I get motivated to suceed at making an awesome pie. This newfound motivation happens every year or so. Yesterday I saw this pie on the cover of Family Circle and the urge struck!!  This pie turned out to be...just ok.  I won't even blame the recipe because I'm sure the results are due to my lack of pie making skills.  It is certainly an edible pie and some might even think, quite good but it was very middle of the road to me.

For one, I think the filling had a bit too much thickener BUT I will say, that I chose to add a bit more thickener than the recipe called for because I've had pie disasters in the past where there was not enough thickener and it flowed like a river when I cut into it...and that's after the pie had cooled!  This pie sliced a little too neatly.  It wasn't quite "jelled" but it was a little too firm for my taste.  It should have oozed more when I sliced it. There was no oozing at all.

Also, the flavor was quite bland.  Now, that could have been the quality of fruit I was using.  I used frozen cherries and blackberries & raspberries from the supermarket.  Not tasteless fruit but not super concentrated flavor either.  I added vanilla and a bit of almond to the filling which the recipe did not call for and I think it helped a bit but still was lacking something.  Tartness, maybe?  Yeah, I think that's it.  Berries naturally can be a bit tart, even when sweetened but this filling lacked that.

The crust, well, I used a Marie Callanders frozen crust.  Yep.  I didn't make a homemade crust. I happen to like the Marie Callanders crust and it sure was easy to pull it out of the freezer, slop some filling in there and cover it with the already rolled out 2nd crust.

This pie recipe is slightly adapted from the cover of the Family Circle July 2011 edition.  It's the pie on the cover and theirs looks beautiful!  I doubled the filling recipe and made 2 pies.  One of mine had the lattice top and one did not. They are both pictured below! Of course I cheated with the lattice and didn't weave.  Just laid them down on top of one another. Lame, I know.


Cherry Berry Pie

Filling:
3/4 cup plus 2 teaspoons granulated sugar
1/3 cup quick cooking tapioca
1 tablespoon cornstarch
1/4 teaspoon salt
1 1/4 cups cranberry juice blend
3 cups pitted fresh sweet cherries (or a 16 oz package frozen, thawed 1 hr)
1 1/2 cups fresh raspberries (6 oz container)
1 egg yolk mixed with water

In medium saucepan, combine 3/4 cup of the sugar, the tapioca, cornstarch and salt.  Whisk to blend. Add juice and stir till smooth. Cook, stirring for 5 minutes until thickened and bubbly. Remove from heat and stir in cherries and raspberries.

Put cooked filling into pastry lined pie plate.  Cover with another pastry crust.  Fold edges under and crimp together.  Brush the top with egg yolk/water mixture and then sprinkle with remaining sugar.

Bake pie at 400 degrees for 15 minutes. Reduce heat to 375 degrees and bake an additional 45 minutes. Cover pie edges if browning too quickly during baking.  Cool at least an hour before slicing.

Sunday, April 18, 2010

Apple Crostata


I've had lots of apples on my kitchen table that were not quite eating out of hand quality but I didn't want to compost them. I'm hesitant about making pies usually. The crust scares me. I've had plenty of pie failures. But this apple crostata sounded so easy and it received rave reviews on Food Network so I thought why not give it a try.
I cannot say enough good things about this sort of pie. So so so so easy. I cannot even believe how quickly it all came together. It baked in about 35 minutes and was cool enough to eat in another 30 minutes. Really! The crust was out of this world! Slightly sweet & flakey with a nice crunch. Oh my word this was so wonderful! It's not super sweet so if you like your apple pie on the sweeter side, maybe add another 1/8 cup of sugar or maybe even brown sugar. This would be great for a dinner party. It's looks impressive & rustic if you place it on a nice serving platter. But I want to mention again how incredibly easy this was. You really can't mess it up. Mine did stay in the oven longer than the recipe states and that's mainly because my apples were not soft enough yet. I think mine might have been in as long as 35-40 minutes. It's very fragile when it first comes out of the oven but when it cools it becomes a bit sturdier. I bet this would also be fantastic with a caramel sauce drizzled on each serving.
It's not a very big dessert. I would say you get about 6 slices that are not very big. When I was putting it together, it seemed like an awful lot of apples for the little patch of dough that I rolled out but the apples cooked down quite a bit so they weren't so mounded afterward. I think I diced my apples smaller than the recipe called for and they still took longer to bake than the recipe stated. So I suggest cutting them smaller. The spice in this is not really strong. I liked it but if you want it spicier, then add another shake of cinnamon or allspice.

Please try this! You won't be disappointed.


I thought for sure this was going to fall apart in the oven. I used no water to seal the edges or seams. Somehow it stayed together and did not leak! Amazing!


I baked it on parchment. The parchment turned a super dark brown on the edges of the pan. It slid off the cookie sheet easily onto a cooling rack. I was worried that the bottom of my crostata would be too brown but it wasn't. I had the piece of parchment on top of 2 cookie sheets to prevent overbrowning.


The crust almost tastes like a crunchy sugar cookie. So delish!


Apple Crostata

foodnetwork.com
Ina Garten

Ingredients

For the pastry:

  • 1 cup all-purpose flour
  • 2 tablespoons granulated or superfine sugar
  • 1/4 teaspoon kosher salt
  • 1/4 pound (1 stick) very cold unsalted butter, diced
  • 2 tablespoons ice water

For the filling:

  • 1 1/2 pounds McIntosh, Macoun, or Empire apples (3 large)
  • 1/4 teaspoon grated orange zest
  • 1/4 cup flour
  • 1/4 cup granulated or superfine sugar
  • 1/4 teaspoon kosher salt
  • 1/4 teaspoon ground cinnamon
  • 1/8 teaspoon ground allspice
  • 4 tablespoons (1/2 stick) cold unsalted butter, diced

Directions

For the pastry, place the flour, sugar, and salt in the bowl of a food processor fitted with a steel blade. Pulse a few times to combine. Add the butter and pulse 12 to 15 times, or until the butter is the size of peas. With the motor running, add the ice water all at once through the feed tube. Keep hitting the pulse button to combine, but stop the machine just before the dough becomes a solid mass. Turn the dough onto a well-floured board and form into a disk. Wrap with plastic and refrigerate for at least 1 hour.

Preheat the oven to 450 degrees F.

Flour a rolling pin and roll the pastry into an 11-inch circle on a lightly floured surface. Transfer it to a baking sheet.

For the filling, peel, core, and cut the apples into 8ths. Cut each wedge into 3 chunks. Toss the chunks with the orange zest. Cover the tart dough with the apple chunks leaving a 1 1/2-inch border.

Combine the flour, sugar, salt, cinnamon, and allspice in the bowl of a food processor fitted with a steel blade. Add the butter and pulse until the mixture is crumbly. Pour into a bowl and rub it with your fingers until it starts holding together. Sprinkle evenly on the apples. Gently fold the border over the apples to enclose the dough, pleating it to make a circle.

Bake the crostata for 20 to 25 minutes, until the crust is golden and the apples are tender. Allow to cool. Serve warm or at room temperature.

Tuesday, August 25, 2009

Apple Hand Pies


Mmmmmm.....these little apple hand pies are simply delicious. To be honest, I do not enjoy making them. In fact, they are a pain in the ass but the results are so yummy that every once in awhile I make them. This is one of those days. Yeah, I guess I could do it the really quick way and purchase pie crust or puff pastry and I could also purchase the apple filling. But I had a big supply of apples and these are what came to mind. I made the apple pie filling yesterday, I made the dough last night and put them all together today. By the time I was putting the last hand pie together, I was sooo ready to be done. Ugh! I'm not going to post a recipe because I just made it up as I went along and each time I make these they turn out a bit different than the last time. If you have a favorite pie crust recipe, then throw that together. The filling could easily come out of a can. Any filling would be great - one time I used the "Wilderness Raspberry Pie Filling" and it turned out to be one of my favorite pies I've ever made. I think I might have thrown a handful of fresh raspberries in there for better flavor and texture. I've made peach, blackberry, raspberry and also lemon. I had some left over buttercream icing from the baby shower cake the other day so I heated it up and spread it over the finished pies. It was wonderful.


I was careful to make sure I securely sealed each pie edge. In the past I've had many a pies that have leaked. Before going in the oven, I brushed the dough with heavy cream.


Aren't they...um.......rustic looking? They aren't the most beautiful pies but believe me, they are so delicious. I have a difficult time getting them all to look the same. I don't even try, really.


My pie dough turned out really tasty this time and super flakey. I put shortening AND butter in the crust and instead of ice cold water, I used cold heavy whipping cream. Oh, and a touch of vinegar which is supposed to make crusts more flaky. It was pretty good and that's saying a lot because I'm not good at pie crusts!


My apple filling was perfectly spiced and just the right thickness. I used a bit of cornstarch and a bit of tapioca starch to thicken it. I sweetened the filling with both granulated and brown sugar.


Wednesday, July 15, 2009

Dutch Apple Pie


As you may have noticed, I don't do pies that often. I'm a confident baker but for some weird reason, I'm not good at making pies. I'm just not. My pies are edible but they will win no prizes. I won't get requests to make them and I don't pretend they are the best. And with that........here is my latest pie making attempt. Again, I had many apples to use and apple pie is one of the only desserts I can think of to make that will use up a large amount of apples. I don't mind making pie crusts but this time I simply used a premade Marie Callandars crust. And I must say, for a premade crust, these are damn good. WAY better than Pillsbury. And for a thickener, I chose tapioca starch. It looks just like flour and it only takes a small amount to thicken nicely. I overdid it this time on the thickener and my pie was too firm. Darn! I can never get it right! Either too runny or too firm. Tapioca starch can be found at Asian grocery stores. I found mine at Uwajimiya in Seattle. It's very inexpensive and it's excellent for fruit pies because it will not make your filling cloudy at all - like sometimes flour & cornstarch will. Tapioca starch leaves your filling very clear and shiny looking. In fact, tapioca starch is recommended for lattice pies since you can see the filling so easily through the lattice. It makes for an attractive filling.

I found this recipe on allrecipes.com and of course it has wonderful reviews. It is indeed tasty. Just make sure you bake your pies long enough because pulling it out too early will mean crunchy apples. You will have to cover the whole pies near the end of their baking time or they will brown too much. Your pie will need that extra baking time to soften the apples.

That's it for me and pies for awhile.


If you want to cheat and not make a pie crust, then I recommend these. These are seriously good. They come 2 to a pack.


The apples were tossed with flour, sugar, cinnamon, nutmeg & allspice and then poured into a frozen crust.


Wonderful thickener and so inexpensive. Keeps your fillings very clear not cloudy.


Dot filling with pats of butter. Then bake like this at 425 degrees for 10 minutes. After 10 minutes, remove from oven to cover with the crumb mixture.


Distribute the crumb mixture on top.


Out of the oven and cooling.


I do like somewhat firm pies but considering that this pie is still slightly warm, it should not slice this neatly.


This golden brown crust is so flakey and delicious.


It's so difficult to remove that first slice without messing it up! Here is the first slice and half of the bottom crust was left in the pan! Ugh!


Dutch Apple Pie with Oatmeal Streusel
adapted from allrecipes.com

Ingredients:
1 (9 inch) pie shell
5 cups apples - peeled, cored and sliced
2 tablespoons all-purpose flour
2/3 cup white sugar
1/2 teaspoon ground cinnamon
1/4 teaspoon ground nutmeg
1/4 teaspoon ground allspice
2 tablespoons butter
3/4 cup all-purpose flour
1/2 teaspoon ground cinnamon
1/2 cup packed brown sugar
3/4 cup rolled oats
1 teaspoon lemon zest
1/2 cup butter
Directions:
1. Preheat oven to 425 degrees F (220 degrees C). Fit pastry shell into pie pan and place in freezer.
2. To Make Apple Filling: Place apples in a large bowl. In a separate bowl combine 2 tablespoons flour, white sugar, 1/2 teaspoon cinnamon, nutmeg, and allspice. Mix well, then add to apples. Toss until apples are evenly coated.
3. Remove pie shell from freezer. Place apple mixture in pie shell and dot with 2 tablespoons butter or margarine. Lay a sheet of aluminum foil lightly on top of filling, but do not seal.
4. Bake in preheated oven for 10 minutes.
5. While filling is baking, make Streusel Topping: In a medium bowl combine 3/4 cup flour, 1/2 teaspoon cinnamon, brown sugar, oats, and lemon peel. Mix thoroughly, then cut in 1/2 cup butter or margarine until mixture is crumbly. Remove filling from oven and sprinkle streusel on top.
6. Reduce heat to 375 degrees F (190 degrees C). Bake an additional 30 to 35 minutes, until streusel is browned and apples are tender. Cover loosely with aluminum foil to prevent excess browning.