Saturday, December 22, 2012

Peanut butter peanut butter cup cookies

I cannot get over how delicious these cookies are!  Out of control!  If you don't like a peanut butter chocolate combination, you will not like these.  There is a lot of peanut butter and a lot of chocolate going on in these.  I found them on a blog called
Immediately when I saw her photos, I knew I had to make them and I'm sure glad I did.  Yes, these are super rich but sooo good.  They are really big and heavy cookies.  That is a full size Reeses Peanut Butter Cup on top of the cookies! There is another few cups of mini Reeses cups mixed up in the dough.  I highly recommend this recipe.  It's super easy and actually really quite quick to put together and I even made a double recipe!  I don't think a single recipe would be worth it.  I probably got about 20 - maybe not even that - out of a double recipe.  That's a perfect amount. I think the Novice Chef got 18 out of her single recipe.  I guess I made my cookies really large but they don't seem too montrous.  For the mini cups that I mixed into the dough, I purchased the bags of the really small unwrapped cups.  They are a little more expensive but the tiny size is great and it's so easy to just open the bag & pour.  No unwrapping!  These aren't exactly Christmasey looking but I'm including them in some of my baked goods that I'm giving away for gifts.
There is a note below from The Novice Chef about the baking time....it mentions that the cookies will not appear to be done when you remove them from the oven. That is true.  I DID leave them in for 2 minutes longer because I think my oven requires that, but when I removed the cookies sheets from the oven, the cookies still looked slightly doughy. They were super soft to the touch too. They definitely firm up as they cool.
Delicious!!!


Reeses Peanut Butter Cup Cookies

From The Novice Chef blog

Ingredients:

1 3/4 cups all-purpose flour
3/4 teaspoon baking soda
1/2 teaspoon salt
1/2 cup (1 stick) unsalted butter, softened
3/4 cup peanut butter (I used 1/2 chunky & 1/2 creamy)
1/2 cup white sugar
1/2 cup packed brown sugar
1 egg
1 teaspoon vanilla extract
1 (8 oz) bag Reese's Mini Peanut Butter Cups
18 Reeses full size cups unwrapped
 

Directions:

Preheat oven to 350°F. Line two baking sheets with parchment paper.
Combine the flour, baking soda and salt in a medium bowl. Set aside.
In the bowl of a mixer, beat the butter, peanut butter and sugars, until light and fluffy. Add in the egg and vanilla.
Gradually add in the flour mixture on low speed. Stir until dough forms. Then stir in Reese's Mini Peanut Butter Cups by hand.
Using your hands, form balls of dough with 2 heaping tablespoons of dough. Gently flatten cookie dough (to form a disk shape) and place on prepared baking sheets.
Bake for 8 minutes and remove from oven. Press a Reese's Peanut Butter Cup into the center of each cookie. Bake cookies for 3 minutes more. Remove from oven and let cool for 5 minutes before transferring cookies to a rack to cool.

Note: Cookies will not spread much at all and will look like they are not done baking. But I promise they are! Once they finish cooling, the cookie and chocolate will become firm and you will have a magically soft and crumbly cookie!


Monday, October 15, 2012

60 Minute Cinnamon Rolls


I know these photos aren't fantastic but I really wanted to post this recipe.  With the days getting shorter, I'm having a tough time with a lighting source  for my photos. Even when it was the middle of the day, it was so gray and rainy today that it was dark all day long.
But anyway, these cinnamon rolls took a bit longer than 60 minutes but not by much. They came together really quick.  I enjoyed them a lot.  I found the recipe on the following blog:
 
I knew right away that I wanted to try them.  They are super delicious and extremely easy. I don't like them as well as my favorite cinnamon roll recipe but hey, they are 60 minutes!!  I usually ice my finished cinnamon rolls with a cream cheese icing but this time I simply used a vanilla glaze (powdered sugar, vanilla & milk).  I should have rolled my rolls a bit tighter because a bunch of my filling melted out & onto the parchment paper below BUT, I had made an extra amount of filling so in the end it was still a good amount inside each roll.  One good tip I got from this recipe: instead of using flour on my counter tops to roll out my dough, spray it with Pam instead.  No sticking whatsoever and you don't get too much flour into your dough!  I will use that hint from now on.  I wonder if it would work for sugar cookie dough too?  Anyone know?
I used bread flour in these cinnamon rolls but the Home Based Mom blogger says all purpose flour would be fine.  I mixed the dough all in 1 single mixing bowl that my Kitchen Aid mixture uses.  I then used my dough hook and mixed for 10 minutes.  I popped the mixed dough out onto my counter top that was coated with non stick spray, covered it with plastic wrap and let it sit for 10-15 minutes.  It rolled out like a dream.  So easy!!
I still can't believe I can make an awesome pan of cinnamon rolls in about an hour from beginning to end! Wow!
Oh, I made one single change, I added about 2 teaspoons of vanilla extract to the dough when it was in the liquid stage, after the yeast had bloomed.  I liked the extra flavor!


60 Minute Cinnamon Rolls
  • 1 C warm water
  • 3/4 C room temperature buttermilk
  • 1/2 C sugar
  • 1/4 C melted butter
  • 3 T regular yeast
  • 2 teaspoons vanilla extract (my addition)
  • 1/2 T salt
  • 2 eggs
  • 5-6 C bread flour
  • Filling
  • 2 Tbsp butter, melted
  • 1/2 C brown sugar
  • 1/2 C sugar
  • 2 Tbsp cinnamon
  • Frosting
  • 1/4 C butter, softened
  • 3 C powdered sugar
  • 1 tsp vanilla
  • enough milk or half and half to make it spreading consistency.
 
Instructions
  1. Mix together water, buttermilk, sugar, melted butter and yeast in a bowl. Allow to sit for 15 minutes..
  2. Add in salt, eggs and flour and mix for 10 minutes.
  3. Allow to sit for 10 minutes.
  4. While resting prepare your filling
  5. Mix together 2 Tbsp melted butter, brown sugar, sugar and cinnamo0n.
  6. Roll dough out on to greased countertop into a 12 x 16 inch square.
  7. Sprinkle with filling and roll up. Cut into 12 large rolls.
  8. Place rolls on a cookie sheet covered with a silpat or parchment paper.
  9. Bake at 400 for 12-15 minutes.
  10. Mix together frosting and spread on warm rolls.

Monday, September 17, 2012

Slutty Brownies

 
I guess I'm a little late in the game with these brownies.  Why had I not heard of them till last week when people have been baking, eating & posting them for months?  I knew I had to make them when I finally did read about them.  The recipe below is not the EXACT recipe I used but I had looked at so many blogs that had these brownies posted that I forgot which blog I copied the recipe from and I'm sorry about not giving you credit for it!  Most of the recipes resulted in a 9x9 pan but I wanted to use a 13x9 inch pan, which the recipe below uses.
 
These are heavenly!  Honestly, how can you go wrong with chocolate chip cookie dough, Oreo cookies and fudgy brownies all together?  I topped it all off with some colorful sprinkles because I think sprinkles just make everything better!  These brownies are super thick but they do deflate a bit upon cooling.  The middle of the pan remained very soft & fudgy and gooey. Not underdone but just right. The sides of the pan were a bit more done with some crunchy edges which some people really love.  I prefer the fudgy center which I show you in these photos!
 
They may look complicated to put together but they are not.  They come together rather quickly actually but they take quite awhile to bake because they are so thick.  I did not go by the time the recipe stated, I just kept checking in on my own.
 
Of course if you do not have a huge sweet tooth, you will not like these.  They are rich, decadent, sweet & just plain delicious!


Slutty Brownies
For the Cookie Base:
  • 1 1/2 cups (7.5 oz) all purpose flour
  • 1 tsp baking powder
  • 1/2 tsp salt
  • 1 1/2 cups packed (10.5 oz) light brown sugar
  • 12 Tb unsalted butter, melted and cooled
  • 2 large eggs
  • 1 1/2 tsp vanilla extract
  • 1 (12 oz) bag semisweet chocolate chips
 
  • 1 package Oreo Cookies
For the Brownie Layer:
  • 1/3 cup Dutch-processed cocoa
  • 1 1/2 teaspoons instant espresso (optional)
  • 1/2 cup plus 2 tablespoons boiling water
  • 2 ounces unsweetened chocolate, finely chopped
  • 4 tablespoons (1/2 stick) unsalted butter, melted
  • 1/2 cup plus 2 tablespoons vegetable oil
  • 2 large eggs
  • 2 large egg yolks
  • 2 teaspoons vanilla extract
  • 2 1/2 cups (17 1/2 ounces) sugar
  • 1 3/4 cups (8 3/4 ounces) unbleached all-purpose flour
  • 3/4 teaspoon table salt
Instructions
  1. For the Cookie Base: Preheat oven to 350°F. Line a 9″ x 13″ pan with parchment or grease well. In a medium bowl, whisk together flour, baking powder, and salt; set aside.
  2. In a large bowl, whisk brown sugar and melted butter together. Add eggs and vanilla and mix well. Using rubber spatula, fold dry ingredients into egg mixture until just combined. Do NOT overmix. Fold in chocolate chips. Pour into the prepared pan and smooth out the top.
  3. Layer Oreo's across cookie dough as tightly as possible, breaking any extra cookies to fit empty spaces.
  4. For the Brownie Layer: Whisk cocoa, espresso powder (if using), and boiling water together in large bowl until smooth. Add unsweetened chocolate and whisk until chocolate is melted. Whisk in melted butter and oil. (Mixture may look curdled.) Add eggs, yolks, and vanilla and continue to whisk until smooth and homogeneous. Whisk in sugar until fully incorporated. Add flour and salt and mix with rubber spatula until combined.
  5. Scrape batter over Oreo layer and bake until toothpick inserted halfway between edge and center comes out with just a few moist crumbs attached, 50 to 60 minutes. Transfer pan to wire rack and cool 1½ hours.

Monday, September 10, 2012

Zucchini Banana Bread

 
This is a great recipe to use up some ripe bananas that have been sitting on your counter and the zucchini that keeps appearing in your garden!  It's a super simple and completely delicious recipe.  No mixer needed. Just a big bowl & a spoon or spatula to mix it.  I actually doubled the recipe and it made 8 mini loaves.  As you can tell from my photos, I put a super crunchy crumbly topping on all of my loaves.  It's a brown sugar, oatmeal, cinnamon concoction. It really made the bread outstanding - I highly recommend that addition.  I'm not into nuts in my baked goods so I left those out and I just didn't think the cranberries sounded good in this flavor combination although that is what the recipe called for - so I left them out also. The recipe calls for 1 tablespoon of cinnamon and I realize that sounds like a lot, and I was hesitant to add a full tablespoon but I'm glad I did because it wasn't overpowering at all.  In fact, I think it could have used a bit more.  To make the bread a little bit healthy, I substituted 1 cup whole wheat flour for 1 cup of the all purpose. Wonderful!
I will definitely keep this recipe in my repertoire.  I love the fact that it's so simple.  I think you will enjoy it.  Be sure to watch it carefully, it goes from gooey middle to done rather quickly.  If you use mini loaf pans like I did, you will have to remove the loaves from the oven much sooner than the called for 50 minutes.  Just keep a close eye on them.  Mine were even more difficult to determine the doneness due to the huge amount of cumbly topping on them!


Zucchini Banana Bread
 
3 eggs
3/4 cup vegetable oil
2/3 cup packed brown sugar
1 cup white sugar
1 cup grated zucchini
2 bananas, mashed
2 teaspoons vanilla extract
3 1/2 cups all-purpose flour (I used 1 cup whole wheat flour & 2.5 cups all purpose)
1 tablespoon ground cinnamon
1 1/2 teaspoons baking powder
1 teaspoon baking soda
1 teaspoon salt
1/2 cup dried cranberries  (I didn't add)
1/2 cup chopped walnuts (I didn't add)
 
Preheat oven to 325 degrees F

Grease and flour two 8x4 inch bread loaf pans. (I used 4 mini loaf pans)
In a large bowl, beat eggs until light yellow and frothy. Add oil, brown sugar, white sugar, grated zucchini, bananas, and vanilla; blend together until well combined. Stir in the flour, cinnamon, baking powder, baking soda, and salt. Mix in the cranberries and nuts. Divide the batter evenly between the two prepared loaf pans.

At this point, I made a crumble topping to put on top of each of my mini loaves. I simply melted a stick of butter in the microwave, added some brown sugar (approx 1.5 cups) to it, some flour (approx 3/4 cup), about 1 tsp cinnamon and some old fashioned oats (approx 1 cup). Stir it  till completely mixed then sprinkled on top of each loaf before putting it in the oven.

Bake in the preheated oven until a toothpick inserted in the center comes out clean, about 50 minutes. Allow to cool in the loaf pans on a wire rack before removing and serving.


Tuesday, July 31, 2012

Copycat recipe of Sprinkles Red Velvet Cupcakes

I have never had a Sprinkles cupcake but I hear they are fantastic - especially the red velvet ones.  Jaclyn from Cooking Classy blog came up with this copycat recipe.  I was not specifically looking to make red velvet cupcakes but just came across this recipe while browsing different baking blogs.  Sometimes recipes just jump out at me for no particular reason.  I was bored, I wanted to bake, I had all the ingredients, it looked like a yummy recipe and it received good reviews.  Ok!  I was in!  I did like this recipe alot but I have a couple of other red velvet cake recipes that I like just as well.  I kind of prefer the ones that have oil in them (in addition to butter) because it gives the cake a moistness not matched by butter only cakes.  The only change I made in this recipe was I sifted my dry ingredients together.  Oh, and Jaclyn mention putting the cooling cupcakes in an airtight container to continuing cooling to presevese moisture - I also didn't do that part - mostly because I didn't even notice that hint till just now as I was posting this!  This cake was super soft & delicate. Not dense at all. Very subtle chocolate flavor which is what a red velvet cake should be. My cupcakes did have a slight dome when they were first removed from the oven but they flattened as they cooled.  The photos show cupcakes that were in NON greaseproof liners.  I also baked some in greaseproof liners - really pretty decorative liners.  I don't know about you, but I do NOT have good luck with greasproof liners.  All of the cupcakes that were in greaseproof liners pulled away from the liners almost entirely. They looked horrible with little part of the cupcakes still attached to the liner and the ripped up cupcake sitting in the middle.  I do not know how to prevent that but it makes me not want to use them.  Does anyone have suggestions?  I've tried filling them a bit fuller so the extra batter would seal the edges but it didn't work.

But anyway, back to the cupcakes!  This recipe is very simple to throw together and that's always nice.  Make sure you use the vinegar when making a red velvet cake. It's an important ingredient in the texture of the cake.  I know it's a very small amount but it's crucial for the texture.  Everyone is always so in awe of the beautiful color of this cake.  It IS very striking and makes a gorgeous presentation.  I really don't know anybody that doesn't like red velvet cake!


Sprinkles Red Velvet Cupcakes Yields 12 insanely delicious cupcakes
Cooking Classy by Jaclyn

Ingredients:
1 1/3 cups all-purpose flour
3 Tbsp cocoa powder
1/2 tsp baking soda
3/4 cup salted butter, firm but not cold*
1 cup + 2 Tbsp granulated sugar
2 large eggs
1 tablespoon red food coloring
2 teaspoons vanilla extract
1/2 cup whole milk
1 teaspoon distilled white vinegar

Preheat oven to 350 degrees. In a mixing bowl, whisk together flour, cocoa powder and baking soda, set aside. In a separate large mixing bowl, using an electric mixer, whip together butter and sugar until pale and fluffy, about 3-4 minutes. Add in eggs one at a time stirring after each addition. (Now stand back and change out of any nice shirt you have on and) Add red food coloring and vanilla extract and mix until combine. In a small mixing bowl (or in the measuring cup you used to measure milk), combine milk and 1 tsp vinegar. Add milk mixture and flour mixture to cupcake mixture, alternating in two separate batches, mixing until combine after each addition. Divide batter evenly among 12 paper lined muffin cups, filling each cup about 2/3 full. Bake in preheated oven 20-23 minutes until toothpick inserted into center of cupcake comes out clean. Remove from oven and allow to cool about 2 minutes in muffin tin, then transfer to wire rack to cool for 10 minutes, then transfer to an airtight container to cool completely (this just helps them retain more moisture).


Sunday, July 22, 2012

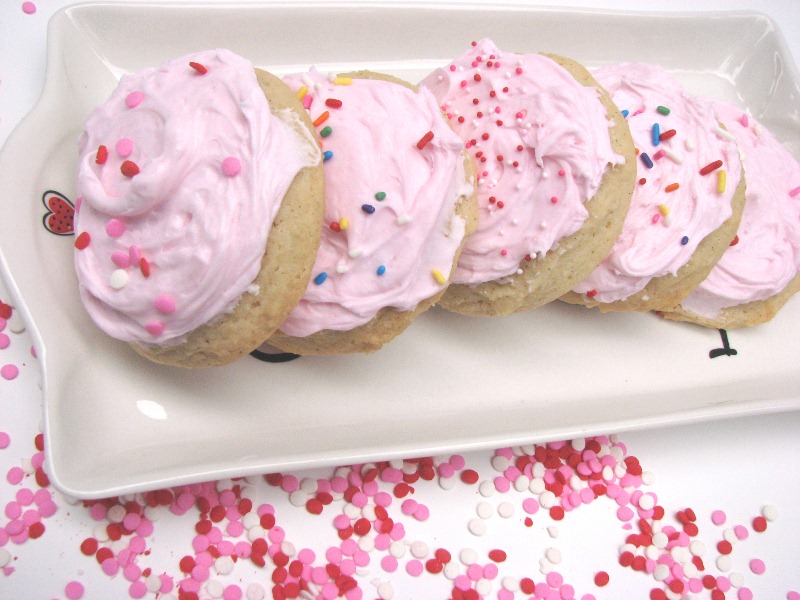
Soft Sugar Cookies with Vanilla Icing


I have posted this sugar cookie recipe before but I just love it so much that I want to share it again.  If you like thick, soft, cakey sugar cookies then you will love this recipe!  The cookies are delicious on their own but with the icing they are absolutely excellent.  I make these a couple of times a month and I always flavor my icing with a clear vanilla.  I suppose you can use other flavors but I'm a vanilla girl.  I sometimes will add some almond flavoring to the cookies but always in addition to the vanilla. This time I used a big fat moist vanilla bean and scraped every last seed out of it and added it to the cookie batter.  I also added a hefty splash of vanilla extract.

For the icing I use a simple American Buttercream - butter, powdered sugar, milk, flavoring, pinch of salt.  I have to let the cookie sit for a few hours after I ice them so the frosting developes kind of a crust. That way I can stack them easier.  I make sure to put a piece of wax paper in between each layer.  As you can see from my photos, I do NOT skimp on the icing. I like a big thick layer on my cookies so my teeth sink through the sugary vanilla-y smooth goodness before hitting the soft vanilla cookie.

These cookie may look time consuming but they aren't.  Actually, the icing of the cookies takes longer than the cookie baking part. I do not chill the cookie dough after I mix it although the orinigal recipe suggests it.  I use a cookie scoop and place the balls of dough onto a parchment lined cookie sheet.  I do not flatten the cookies either because I want them to remain thick.  I make certain to take the cookies out of the oven before they turn golden on the edges.  If they stay in too long, they are not as soft.  They feel slightly underdone right after I remove them from the oven. Don't worry, they will cool and set up nicely although they still are somewhat fragile after they cool. These are ultra soft! These are big time comfort food for me!  I love them almost as much as chocolate chip cookies.


Soft Sugar Cookies
1 cup butter
1 cup sugar
2 eggs
1 tbsp vanilla (I always add more or you can use almond, lemon, orange or a combination)
3 cups flour
3 tsp baking powder
1/2 tsp salt.
Directions
Preheat oven to 350

Mix dry ingredients in a bowl ; set aside.

In a separate bowl, combine butter, sugar, eggs, and vanilla (or another extract like almond). Beat until mixed well. Add the dry ingredients slowly. Mix until combined.  Either scoop balls of dough with a cookie scoop or roll balls of dough and place on parchment lined cookie sheet.

Bake 10-15 mins (time depends on size so start with 10 minutes & watch closely)or until just the edges of cookies start to turn a very, very light golden brown. Don’t over-bake. For an extra-doughy consistency, remove the cookies before the edges start to brown..