Sunday, August 17, 2014

Macrina Bakery Squash Harvest Loaf


Macrina is a VERY popular bakery on 1st Avenue in Seattle in the Belltown neighborhood.  They make this quick bread from roasted butternut squash called Harvest Bread.  It's similar to pumpkin bread but not as sweet and has kind of more of an "earthy" flavor.  It has toasted pecans, walnuts and pumpkin seeds in the bread and also sprinkled on top before baking.  For pumpkin bread I simply open a can of Libby's Pumpkin but for this bread I bought some fresh butternut squash from Carpinito Farms in Kent.  The squash I bought was fairly small so I bought 5 of them.  I needed 2 cups of pureed squash per recipe and I was making a double recipe so I wanted to be sure I had enough.  My squash roasted in a 400 degree oven for 1.5 hours before it was fork tender. Then I had to let it cool for awhile and then I had to peel it and puree it in a food processor.  I had a little over 4 cups.  I ate the remainder few spoonfuls with a little brown sugar and salt & butter. Yum!  

But anyway, because of the squash puree preparation, this bread took hella looong time!   But it was worth it.  This bread is so tender and so flavorful.  I thoroughly enjoyed it and I made extra loaves to give some away as gifts.  I figured if I am going though hours of preparation, then I'm making extra!  Next time I might add another teaspoon of cinnamon to the batter.  I could taste it but I think it could have been a bit stronger.  I did not have any pecans so I left those out but I used extra walnuts and pumpkin seeds.   Actually, I really wanted pecans but they were so expensive, even at Grocery Outlet, that I figured I would leave them out.

I highly highly recommend this wonderful autumn like quick bread.  And if you can take the time to roast your own squash and puree it, it will really stand out in the flavor of the bread!  I do not find this bread extra sweet. I've read other reviews where bakers mentioned cutting down on the sugar amount called for.   I don't think it would be sweet enough if I did that.  So I prefer to leave in the full amount called for.


I halved the squash vertically, scooped out the seeds & stringy fibers, placed on a foil lined baking sheet with a big pan of water underneath (for steam- keeps squash moist). Baked at 400 degrees for 1.5 hours.  I tested for doneness with a fork.


I toasted pumpkin seeds and walnuts at 350 degrees for about 10-15 minutes, stirring every few minutes.  I used pumpkin seeds with sea salt on them. 


My squash took awhile in the food processor to get a consistent pureed texture.  I kept finding little chunks.  Had to poke around with my spatula to make sure all the chunks were pureed.


I was kind of heavy handed with the nuts on top.  The recipe called for less on each loaf but I just sprinkled till it felt right.  I toasted more than enough nuts so I had plenty.


The nuts on the inside of the bread were ground.  I didn't use a food processor for this.  I simply put the already toasted nuts in a plastic bag then proceeded to hit with the flat side of a mallet till they were uniform very small pieces.


Macrina Bakery Squash Harvest Loaf
(for 2 loaves)
You need:
  • 2 cups roasted butternut squash purée*
  • 1/2 cup walnut halves
  • 1/2 cup pecan halves
  • 1 cup pumpkin seeds
  • 2 tsp baking soda
  • 2 tsp baking powder
  • 3 1/2 cups all-purpose flour
  • 1 1/2 cups light brown sugar
  • 1 1/2 cups granulated sugar
  • 4 eggs
  • 1/2 tsp nutmeg
  • 1 1/2 tsp cinnamon
  • 1 1/2 tsp Kosher salt
  • 1 cup canola oil
  • 3/4 cup buttermilk
Roasting the butternut squash.
  • Wash and cut the squash in two halves, remove the seeds and place the halves in a rimmed baking sheet, face up, with 1 cup water in the pan. Cook in a preheated oven at 375 F for 1 hour minimum, until the flesh is fork tender.
  • Remove and let cool down before scooping the squash out.
  • Place in a food processor and mix smoothly.
  • Let cool down and use 2 cups for 2 loaves. Keep the rest in the fridge for 3 days max, or freeze it for future times.
Making the loaves
  • Place the nuts and seeds on a rimmed baking sheet and toast for 15 mns. Remove from the oven and let cool down before grinding them, medium. Keep 1/4 cup on the side, for the decoration.
  • Turn the oven temperature down to 325 F.
  • Sift the flour, baking powder, baking soda, cinnamon, nutmeg and salt in a bowl.
  • Add the seeds, minus 1/4 cup. Mix with a wooden spoon.
  • In the bowl of a stand mixer, combine the oil and two types of sugar and use the paddle attachment to mix on medium speed, for 4 mns.
  • Add the roasted butternut squash and continue to mix for 2 mns.
  • Then, add one egg at a time.
  • Remove the bowl from the stand mixer and add the flour and the buttermilk alternatively, until the liquid is absorb each time.
  • Transfer the preparation in 2 oiled loaf pans measuring 9 x 5 x 3″, 2/3 to the top.
  • Sprinkle with the reserved seeds.
  • Cook in the oven for 1 hour, or until a skewer comes out dry once inserted in the loaf. Remove and let cool for 20 mns before unmolding on a cooling rack.


Monday, June 2, 2014

Butter's Chocolate Cake and a new twist on a Swiss buttercream icing


This chocolate layer cake is the first recipe I've have made from the Butter cookbook that I received for Christmas.  This cake is good and it's easy.  It's a DARK chocolate, moist and flavorful cake.  I used the Hershey's dark cocoa powder so it's a lot deeper chocolate than if I simply used the regular cocoa powder.  I made a double recipe and got 3 very thick layers.  I use the 9 inch Fat Daddios cake pans that have the extra high sides - otherwise I think the pans would have overflowed if they were the regular height.  Fat Daddio cake pans are the BEST.  Ever since I've used these pans, my cakes have turned out much better than they used to.  They are not non stick so I always have to spray them first then line the bottom with a parchment circle.  The nice thing is, their pans are not expensive. You can browse & purchase their huge selection of pans many places but I think I've gotten most of mine on Amazon.  I use my 9 inch ones the most.  I have 3 of them because I love making triple layer cakes.

Now to the icing.  I have to admit that I love the basic American buttercream.  It's super sweet and heavy and sometimes a bit gritty but I love it.  American buttercream consists of powdered sugar, butter, vanilla, salt, and milk (some people use water, half n half or cream as the liquid).  Many people will also use some shortening in place of some of the butter - which I always do.  I love the texture that shortening gives an icing but I always use a hi-ratio shortening which makes a difference in the mouth feel of the shortening.  If you have a chance to purchase some hi-ratio shortening, I recommend you buy it and try making some buttercream with it.  Yes, you can always use Crisco but I think the hi-ratio shortening leaves the icing a bit less slick or greasy feeling.  Anyways...... A true buttercream is made with egg whites, granulated sugar, butter & vanilla and maybe a pinch of salt.  The egg whites are heated with the sugar till it's hot and smooth then whipped till stiff.  Then the room temperature butter is beaten in a little at a time and it results in a very smooth, not very sweet, silky & delicious icing that pipes like a dream.  Swiss buttercream & Italian buttercream are basically made this way but with slight differences.   French buttercream is also silky & delicious but it uses egg yolks instead of whites.  I have tried many Swiss buttercream recipes and I DO love the silkiness of the icing and I love the way it spreads and pipes but I must admit, I don't like the fact that it's not very sweet.  I'm sure there are many folks who appreciate the less sweet variety of icing but I love sweet icing.  Plus, it tastes almost TOO much like butter. Like you are eating a mouthful of pure butter. So I've never been one to often make the true buttercream.  But for this cake I tried another buttercream recipe that I happened upon on the internet.  It's very different indeed but I was intrigued.  I'm sure many people wouldn't even call it a TRUE buttercream because it uses shortening AND powdered sugar!  Wow huh?  It has the beautiful consistency of a true buttercream but it's sweeter!  I love it!  I would never even think it would work if I just saw the list of ingredients. But I followed her instructions exactly and it came out perfectly.  Spread like a dream!!   I do wish I would have added another splash of vanilla as I couldn't taste it as much as I would like but other than that, it's a near perfect recipe.  I always use a clear vanilla in my icing recipes.  I like my icing to stay as white as possible.    Here is a link below to my new interesting delicious buttercream.  Try it!!


The icing recipe did not make enough to fill and ice my huge triple layer cake so I used some leftover chocolate buttercream icing that I had previously made to fill my cake.  It was a wonderful combination. 

So in closing, I think the Butter chocolate cake recipe is pretty good but I think I still like the
 Hershey's Black Magic cake recipe better.  But I do think you should try making this unusual buttercream recipe.  Read all of the little tips and hints that she mentions in her blog post about the icing recipe.  It looks like people make all sorts of mistakes making it!  Especially adding the butter when the eggs whites are still too warm or not whipped enough.  That will results in a soupy mess!


Icing recipe can be found on the:

She has so much written in detail about her recipe that rather than type it out for you, just go straight to the source!


by Rosie Daykin

2 3/4 cups all purpose flour
2 teaspoons baking soda
1/2 teaspoon baking powder
1/2 teaspoon salt
2 cups hot coffee (any blend)
1 cup dark cocoa
2 cups sugar
1 cup vegetable oil
4 large eggs
1/2 cup buttermilk
1 1/2 teaspoons pure vanilla

Oven 350 degrees

Sift dry ingredients together - flour, soda, powder & salt. Put aside

In a bowl whisk the coffee & cocoa together till smooth.  Set aside to cook slightly.

In a large bowl whisk together the sugar, oil, eggs, buttermilk and vanilla.  Add the cocoa/coffee mixture and whisk to incorporate.  Add the dry ingredients and whisk till well combined.  

Put batter in prepared pans.

Bake in preheated oven 30-35 minutes or until tests done.

Remove from oven. Cool for about 10 minutes then invert onto racks.


Wednesday, May 14, 2014

Cream Cheese Chocolate Chip Cookies

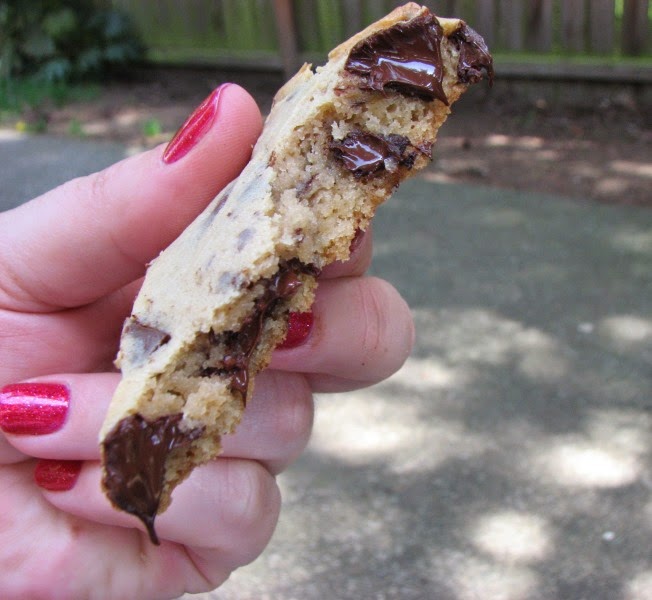
Oh my, this is a gooood recipe.  I do not know how many chocolate chip cookie recipes I have tried making but I know it's around 100.  They are all similar but sometimes they have unusual ingredients or sometimes it's the exact same ingredients as another recipe but different measurements which results in a different texture.  These cookies include a small amount of cream cheese and cornstarch. Those are 2 out of the ordinary chocolate chip cookie ingredients.  I really really liked this recipe.  BUT, I don't think I would like it as well if I had just mixed the dough and started baking right away.

  I made the dough yesterday, lined a 13x9 pan with plastic wrap, pressed my dough firmly into the plastic wrap lined pan, froze overnight, inverted the dough onto a cutting board, carefully peeled the plastic wrap off the big hunk of frozen cookie dough, cut into squares and baked while the square were still frozen solid.  That routine is one of my favorite ways to make chocolate chip cookies.  It always results in extra thick and dense cookies.  I saw the bakers at Specialties Bakery do it that way before and that's where I got the idea.  That is why my cookies are squareish and not round.  It's also super quick because I cut all the dough into squares, position them onto 3 parchment lined cookie sheets and place them all into the oven at once (on 3 different racks).  I can bake 3 pans at once because I have a convection oven.  All 3 pans bake perfectly evenly.

But if you are looking for a cookie recipe that is a little different, I highly recommend this one. But I cannot say how good these cookies would be if you baked the dough immediately after mixing.  I'm sure they would be completely delicious but my guess is they wouldn't be as thick.

Oh, and for my chocolate, I used a huge dark chocolate Trader Joes chocolate bar cut into little chunks and also a bag of Sees chocolate chips which are like a semi sweet chunk.   But I also think these cookies would be wonderful with milk chocolate chips.

I removed my cookies from the oven when the edges were slightly golden brown. The middle still appeared undone but I removed them anyways.  I couldn't even remove them from the cookie sheet for a good 1/2 hour till they set up. That's how soft and gooey they were!  I always just slide my entire sheet of parchment right off the cookie sheet right onto a cooling rack. That way my cookies remain undisturbed till they are fully cooled.


Brandi the pug is photobombing this delicious shot! Yummmm...she is thinking!


Cream Cheese Chocolate Chip Cookies
Based on recipe from:
Ingredients
  • ½ cup unsalted butter, softened
  • ¼ cup cream cheese, softened (don’t use fat free, light or whipped cream cheese!)
  • ¾ cup light brown sugar, packed
  • ¼ cup granulated sugar
  • 1 large egg
  • 2 teaspoons vanilla extract
  • 2 ¼ cup all-purpose flour
  • 2 teaspoons cornstarch
  • 1 teaspoon baking soda
  • ¼ teaspoon salt (kosher or sea salt)
  • 1 cup semi-sweet chocolate chips 
  • ½ cup bittersweet chocolate chips 
Instructions
  1. Whisk together in a medium bowl the flour, cornstarch, baking soda and salt. Set aside.
  2. Cream butter, cream cheese, sugars, egg and vanilla together on medium-high speed until light and fluffy. I use a stand mixer with the paddle attachment.
  3. Reduce the speed to low and slowly add the flour mixture. After each addition mix until just incorporated. I do 5-7 small additions.
  4. Add the chocolate chips and mix briefly to distribute.
  5. I would suggest refrigerating the dough 2 hours or up to 3 days before baking. When you are ready to bake, proceed to the next step.
  6. Pre-heat the oven to 350° and line baking sheets with parchment paper. Scoop the dough using a 2” cookie scoop or a ¼ cup measuring cup and place 2” apart on the cookie sheet. These cookies really don’t spread that much.
  7. Bake 11-12 minutes. The sides should just be starting to brown. You don’t want them to be brown. Just have a nice kiss of color. Let them cool 5 minutes on the baking sheet and then move to a wire rack to cool completely.


Sunday, April 6, 2014

Triple Layer Yellow Cake with Chocolate Icing


I found this recipe for yellow cake on one of my favorite blogs -
She posts so many recipes and I'm not sure why this one caught my eye but I think I was just in the mood to make a yellow cake.  It's been a long time since I've tried to make one and every previous recipe I have tried has resulted in great disappointment.  This one is pretty darn good.  The recipe calls for a particular butter/vanilla McCormicks extract which I did not have so I simply used extra vanilla and then a big splash of Adams Clear Butter extract.  The recipe also mentions that you can use a combination of butter and shortening in the cake (instead of only butter) so I used the combo option.

The crumb on this cake is so fine and velvety - which is what I expect from a good cake!  I've made many a yellow cake recipes that have resulted in a coarse texture and are sometimes dry.  Some yellow cakes I've made are not sweet enough or are not yellow enough.  This one isn't a dark yellow but it's a nice butter yellow and has a wonderful sweet vanilla flavor.  I love love love the texture.  The Cookie Madness recipe as written will result in a double layer cake.  I wanted a triple layer so I made 1.5 recipes.  I can't remember exactly how long I left them in the oven but just make sure to watch the cakes closely because it's a fine line between not done & overdone.  My oven is a convection so it bakes a bit differently.  I watch my baked goods very closely when they are in the oven.

I did not use the icing recipe she lists.  I just made up a simple chocolate icing of butter, hi-ratio shortening, vanilla, a tablespoon of corn syrup, a pinch of salt, powdered sugar & whole milk.  And I whipped and whipped it till it was very light and creamy and had a good spreadable consistency.   I made sure to level the tops of my cake layers before icing the cake.  The layers did not have a big dome, just a little, bit so there was not much to cut off.

Until I find a better from scratch yellow cake recipe - this will be my go to recipe.  It's easy, it's delicious and you probably have all the ingredients in your house right now! (Well, maybe not the cake flour but I think it's VERY important in this recipe so make sure you have some available!).

Below I will list the recipe that Anna from Cookie Madness shows on her blog exactly as she has it written.  I've mentioned my changes above.


Yellow Cake
A classic American style yellow cake with chocolate frosting
Author: 

Ingredients
  • 4 large eggs at room temperature
  • 2 large egg yolks
  • 1 1/2 teaspoons McCormick vanilla butter & nut extract (or 1 teaspoon vanilla)
  • 1 teaspoon vanilla
  • 1 1/4 cups buttermilk, room temperature
  • 3 cups (12 ounces) cake flour
  • 2 cups granulated sugar
  • 4 1/2 teaspoons baking powder
  • 1/2 teaspoon salt
  • 2 sticks (8 ounces) unsalted butter, at room temperature **or use 1 stick butter and ½ cup butter flavored shortening**
Chocolate Frosting
  • 1 stick (4 oz) good quality unsalted butter
  • pinch or two of salt
  • 3 cups powdered sugar
  • 3/4 cup cocoa powder
  • 2 tablespoons sour cream
  • 6 tablespoons heavy cream plus milk as needed
Instructions
  1. Preheat the oven to 350° F. Grease and flour two 9 inch round pans.
  2. Whisk the eggs, yolks, extracts and 1/4 cup of the milk in a bowl.
  3. In a stand mixer bowl with the paddle attached, combine the flour, sugar, baking powder and salt. Stir until thoroughly mixed.
  4. Add softened butter to the flour mixture and stir with a spoon until butter coats flour. Add the remaining 1 cup of milk to the flour mixture and stir until thick and pasty.
  5. With the mixer, beat on medium for about two minutes. Gradually add the egg mixture, scraping down sides of the bowl.
  6. Pour the batter into the pans and bake for about 30 minutes or until cakes spring back when touched.
  7. To make the chocolate frosting, mix the softened butter, salt and powdered sugar together in a bowl. Stir in the cocoa powder, sour cream and cream and beat until well mixed. Add vanilla, then continue beating with an electric mixer and adding milk as needed until icing is thick and creamy. Add more sugar if it’s not sweet enough for you.

Tuesday, September 24, 2013

Cream Cheese Chocolate Chip Cookies


It's been awhile since I posted anything!  Today I was baking and I had some extra time to snap some photos so I thought I would post something.  I've been steadily baking all along - I've just been lazy about snapping pics & taking time to post them.  These cookies are incredibly good so I figured I'd share them with you.  I found them on a blog called Averie Cooks.  I'm not sure how I came across her blog but when I saw these cookies, I knew I had to try them. I'm always excited to try another chocolate chip cookie recipe.

I followed this recipe exactly and I left the dough in the fridge overnight.  The dough was so firm when I went to scoop it out that I really had to use a lot of muscle to get a good round scoop. But I think the firmness of the dough is what kept them from spreading alot. Therefore, the cookies are really thick. They are soft and gooey and you cannot taste the cream cheese in them but somehow it slightly changes the flavor.  I used semi sweet chips and some Guittard vanilla chips.  These cookies are really fragile when you first remove them from the oven.  I had to let them sit a good 15 minutes before I could pick one up.  At first I thought maybe I undercooked them but no, they just needed to sit awhile.  I removed them from the oven when the edges were golden brown. The middle is so thick that it was still slightly doughy when I removed them from the oven, but that's how I like my cookies!


Cream Cheese Chocolate Chip Cookies


YIELD: about 28 medium-small cookies
 
PREP TIME: 10 minutes
 
COOK TIME: 8 minutes
 
TOTAL TIME: 3+ hours, for dough chilling

INGREDIENTS:

1/2 cup (1 stick) unsalted butter, softened
1/4 cup cream cheese, softened (use cream cheese in a block or spreadable, don't use fat-free, light or whipped)
3/4 cup light brown sugar, packed
1/4 cup granulated sugar
1 large egg
2 teaspoons vanilla extract
2 1/4 cups all-purpose flour
2 teaspoons cornstarch
1 teaspoon baking soda
pinch salt, optional and to taste
2 1/4 cups semi-sweet chocolate chips or chunks (I used 1 cup chips and 1 1/4 cups chunks)

DIRECTIONS:

  1. To the bowl of a stand mixer fitted with the paddle attachment, combine the butter, cream cheese (measure it by smooshing it into a 1/4-cup measure), sugars, egg, vanilla, and beat on medium-high speed until well-creamed, light and fluffy, about 5 minutes (or use an electric hand mixer and beat for at least 7 minutes).
  2. Stop, scrape down the sides of the bowl, and add the flour, cornstarch, baking soda, optional salt, and mix until just combined, about 1 minute.
  3. Add chocolate chips and chunks, and beat momentarily to incorporate, or fold in by hand.
  4. Using a medium 2-inch cookie scoop, form heaping mounds (I made 28). Place mounds on a large plate, flatten mounds slightly with your palm, cover with plasticwrap, and refrigerate for at least 2 hours, or up to 5 days, before baking. Do not bake with warm dough because cookies will spread and bake thinner and flatter.
  5. Preheat oven to 350F, line a baking sheet with a Silpat Non-Stick Baking Mat or spray with cooking spray and place mounds on baking sheet, spaced at least 2 inches apart (I bake 8 cookies per sheet). Bake for 8 to 9 minutes, or until edges have set and tops are just beginning to set, even if slightly undercooked, pale and glossy in the center. Do not bake longer than 10 minutes as cookies will firm up as they cool (The cookies shown in the photos were baked with dough that had been chilled overnight, allowed to come to room temp for 15 minutes, and were baked for 8 minutes, with trays rotated at the 4-minute mark. They have chewy edges with soft, pillowy centers). Allow cookies to cool on the baking sheet for 5 minutes before removing and transferring to a rack to finish cooling.
  6. Cookies will keep airtight at room temperature for up to 1 week, or in the freezer for up to 3 months. Alternatively, unbaked cookie dough can be stored airtight in the refrigerator for up to 5 days, so consider baking only as many cookies as desired and save the remaining dough to be baked in the future when desired.

Monday, March 18, 2013

Brown Betty's Chocolate Buttermilk Cake

This cake was kind of a disappointment.  It's the 2nd cake I made from my newest cookbook, The Brown Betty Cookbook.  The first recipe I made from this book was a sour cream poundcake and I did not care for that one either.  The cookbook received such rave reviews on Amazon so I'm not sure what to think.  But this cake is not bad, it's just....eh.  The texture is definitely not a light, fluffy, chocolate layer cake.  It's very dense like a poundcake.  You can tell in my last photo that parts of the cake were downright fudgy. It was kind of difficult to tell when this cake was done.  I'm usually pretty good at removing my cake layers at exactly the right time.  Parts of this cake seemed done but the middle did not.  I even had my cake bands around the outside of my 3 pans.  It's not a dry cake, just kind of dense & crumbly texture.  Not my thing for a layer cake.  I would not make this recipe again.  Hopefully, the next recipe I choose from this book will be a success.


Tuesday, January 8, 2013

Funfetti Cupcakes

I have seen funfetti cupcakes posted on baking blogs for a couple of years now.  I've always wanted to make them but haven't made an effort till now.  They are simply a vanilla cupcake with lots of sprinkles mixed in.  They are pretty and lots of fun!  I just used a large handful of rainbow sprinkles but you can use any color you want.  The sprinkles that are called "jimmies" work the best and bleed the least.  The tiny little balls called non-pareils tend to bleed a lot more.  You just have to be careful to mix very slowly and for not very long after adding your sprinkles to the batter.  You will have minimal bleeding if you are gentle and brief with your mixing. The sprinkles are the very last thing to go into the batter.

My funfetti cupcakes are topped with a simple American buttercream consisting of powdered sugar, vanilla extract, butter, hi-ratio shortening, a touch of corn syrup and heavy whipping cream. And then I whip a looong time till it's nice and fluffy & smooth. I'm not including an icing recipe because I didn't really use one.  I didn't measure ingredients - I just dumped into the mixing bowl and whipped!  BUT, this icing recipe most closely follows the recipe I've linked below.  It's one of my favorites and I use it often.


You can use any white cake recipe to make these, you can even use a white cake mix. This one is completely from scratch and it's pretty darn good. The best part is, it's super easy!  


Funfetti Cupcakes

3 1/3 cups cake flour
1 teaspoon baking powder
1 teaspoon baking soda
1/2 teaspoon salt
2 cups granulated sugar
1/2 cup (1 stick) butter, softened
1/2 cup vegetable oil
2 large eggs
1/2 cup sour cream (I used full fat sour cream)
1 1/2 cups milk (I used whole milk)
4 teaspoons vanilla extract (I used clear vanilla to keep my cake white)
About 1/2 cup sprinkles of your choice

Oven 350 degrees

In large bowl sift together cake flour, baking powder, baking soda & salt.  Add granulated sugar to the dry ingredients & lightly mix. Add softened butter & oil and mix well (I used an electric hand mixer but you can use a stand mixer). At this point the mixture will look thick & clumpy & kind of sandy.  Add eggs & combine. Add sour cream, milk & vanilla extract.  Mix till smooth (but don't over mix). Using a rubber spatula, gently fold in the pretty sprinkles!  Divide batter into cupcake liners (about 2/3 full) and bake till tops spring back when lightly touched. Don't over bake or your cupcakes will be dry so watch the oven carefully.  I started checking the cupcakes after 15 minutes passed. Remove from oven after they test done & cool on wire rack for about 5 minutes before removing the cupcakes from the pans to cool completely. Ice & decorate the cupcakes when they are fully cooled.